
Can am using a micrometer to measure the particle size of my chocolate but it doesn’t work. I get different results every time. Sometimes they are very large (over 100 microns) and sometimes very small (less than 5 microns). It doesn’t make any sense as the chocolate seems smooth to me. HELP!!
It's important to have the right tool for the right job. Every tool has its limitations, and once you determine the correct tool, it is just as important to understand how to use that tool. For most of the people reading this, a micrometer can be the right tool - as long as use it correctly. Actually, the mouth itself is probably the right tool. Given sufficient experience and feedback via a tool, I've found that some people can 'resolve' down to 10-15 um particle size (the largest particle), within +/-5 um. As I’ve said before, most people making chocolate are not going to need an understanding of particle size, shape, or distribution, and spending lots and lots of money to get a number that your tongue could probably tell you.
It is also very important to ask yourself "why do i need this piece of data, and what will I do with it". If the number itself isn't important to you , and really if the information you're looking for is 'Does my chocolate have a good mouthfeel or not?' then just put it in your mouth. If you want the number to gauge progression quickly, and to calibrate your mouth, then a micrometer could very well be the right tool for you.
I actually had to dig a little deeper with this person to find out what micrometer they were using and what their technique was. As it turned out, both were causing the issue of not having good reproducibility and values that were not right (both precision and accuracy were off). Over the past weekend at the NW Chocolate Festival I had the opportunity to speak with someone who has been in the chocolate industry for over a third of a century and whom I respect greatly. We talked a bit about micrometers, measuring technique and when it is and isn’t useful. Much of this comes from him, interspersed with my own knowledge of analytical techniques.
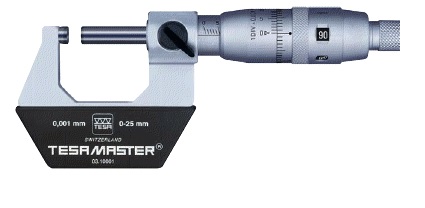
It is critical to have the right tool for the job. In this case, micrometers come in two types that deal with how they close and stop. One is a ratchet and the other is a slip clutch. You want the later. Very simply the ratchet can crush your sample giving you a false low reading. You do not want this style
http://www.google.com/shopping/product/11394996720134678078?hl=en
The specific one that was suggested was this one:
http://www.longislandindicator.com/p109.html
Yep, dials. Analog. You have to learn how to read it. Can you use digital one? I’ve given you his and my recommendation and you can use what you want. But remember, you get what you pay for and GIGO. If your cheaper digital one isn’t accurate, can’t be calibrated or isn’t reproducible, you have basic just flushed your money away.
You now have the proper slip clutch micrometer. How do you use it? Well, first and foremost, NOT like this.
If you do the larger particles are going to follow gravity’s lead, and flow to the bottom, and then out as you close the barrel. The result will be artificially low biased numbers. You need to turn it 90 degrees like this:

Pic You place the drop of chocolate on the barrel and rotate it up until you feel the clutch slip. Record your number, clean it and test it again. I would personally recommend at least 3 times while you are learning and until your results are all within 10 % of the average. And even then, duplicates never hurt.
So, I skipped past the ‘sample’ preparation. Chocolate is thick. There are a lot of particles there and the more there are, the more the more they can resist crushing together. In a perfect world, you would want a single layer of particles. In reality, that isn’t needed and is actually really hard to get. A good compromise is to dilute your chocolate sample with somewhere between 2-5 parts cocoa butter. Frankly, experiment and see what works for you. Your goal is reproducibility.
Back to sample preparation. Take out one teaspoon full and mix it with one tablespoon of cocoa butter (1:3 dilution) and mix it very well with a spatula on a plate for a full minute. Make it look even.


Then put a drop on the barrel and there you are. Keep the barrel vertical, close it up. As you do, what particles are there are going to compress. Some will crush. They will compact against others and crush a little more. At some point the pressure of the slip clutch will push back enough and that will be that. You can take your reading.
What does that reading REALLY mean? It’s a number. It technically isn’t the largest particle because some have been crushed so it could be low. And some stack together so it could be high. And it says virtually nothing about the smaller particles and distribution is also not there. But it does give you a numerical ball part of your largest particle sizes. This has been shown to have a pretty good correlation to the maxima on a distribution plot. In this case, 10-15 microns seems to indicate good, smooth, very fine chocolate. But keep in mind that number is specific to this testing method and the dilution you pick. So keep your dilution and technique constant and for in house use for the most benefit of this number. And use it to try to correlate what you are feeling in your mouth to what your numbers say.
Do you need a micrometer? I personally don’t think so as I think your mouth is just fine. But that said, I’m a number’s geek and tracking progress objectively is almost never bad. You have to be the judge if it is right for you.
Send in your Ask the Alchemist questions to questions@chocolatealchemy.com